RVC v2 Training Guide
- Training Setup
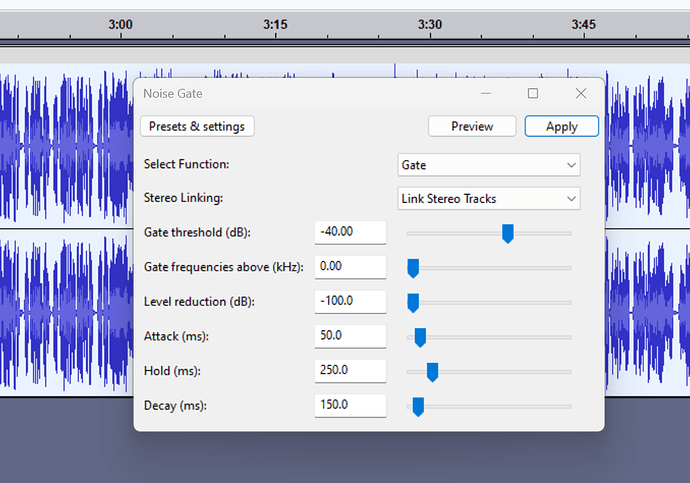
Make sure your dataset is prepared using the best quality isolations or audio that you can find. UVR with Kim vocal models (more recently Voc FT) or MDX B on MVSEP will work best, generally, for isolating the vocals. Then you can use tools like Audacity’s noise gate to cut out silence if you need to, or Adobe Audition if you know how to use that (I’m told it works well).
If you are not training locally, open this training colab, and run the first cells to install.
(If you are training locally, your dataset should be in a folder somewhere with all the files)
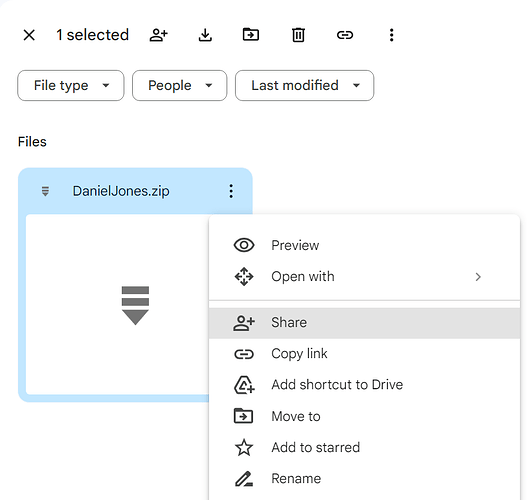
If using the colab, you should make sure to upload your dataset as a zip to the /dataset/ folder on your Google Drive (you will have to create this folder first ofc), and then import the dataset by running this cell with the proper name set.
If everything went right it will read ‘Dataset loaded successfully!’ in the output text.
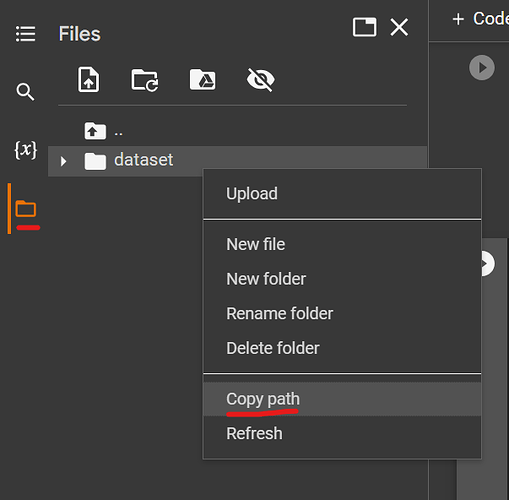
Then, under the files panel on the left, find the new folder it made (not the zip file) and right click to copy the path:
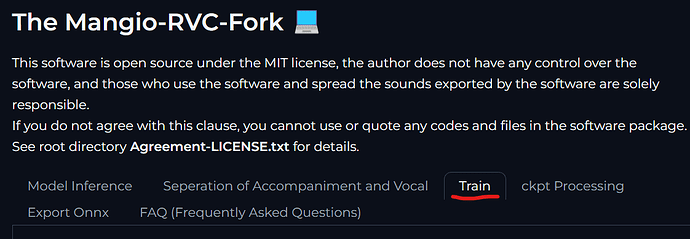
Now you can launch the GUI and go to the Training tab on the top.
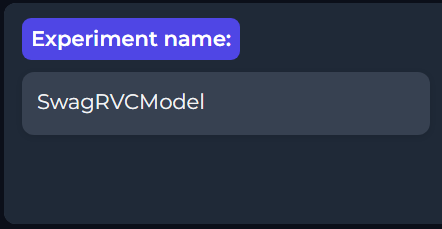
Under the first option, set your name for the model.
I usually keep the rest of these settings the same (generally, v2 is much faster at training and is preferred now)
You may have to turn down the thread count if this is being done locally (so not on Colab). Mine was set to ‘20’ and I had to set it to 4 to prevent BSOD. If you want to stay on the safe side, a value of 1 or 2 will not take much longer than a higher value, since this only applies to the initial processing step.
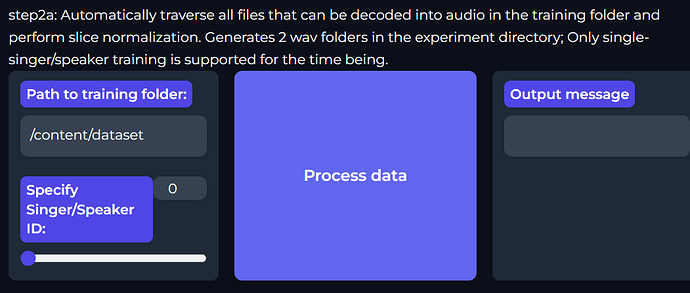
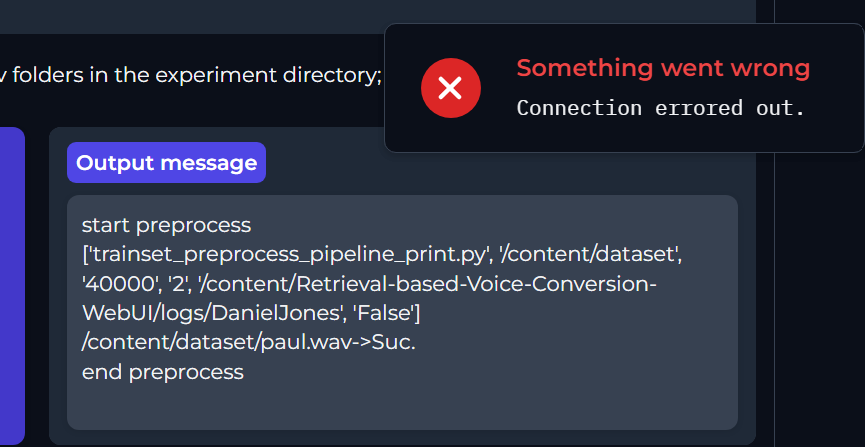
In the first field, for ‘Path to training folder’, paste your copied dataset path from the colab. Then hit ‘process data’. Wait till it fully completes (the colab text console will say ‘end pre-process’ when it’s done)
(Rarely you might see connection errored out, even though it was successful.
try reloading the page and trying again to double check)
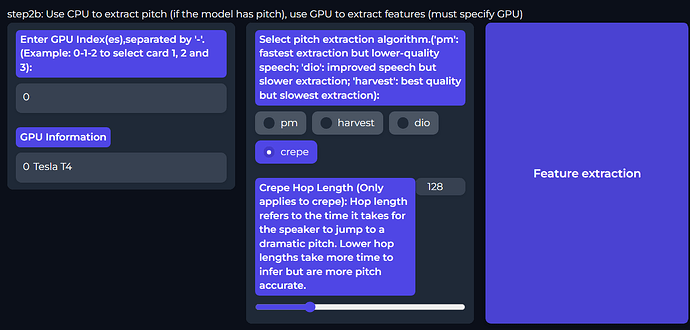
Crepe (specifically mangio-crepe, which is the old implementation, and in my opinion the better one) is the agreed upon best option for training high quality datasets. Lower hop lengths will be more pitch precise and therefore take longer to train, but personally I notice no major difference between 128 and 64 trains. It is up to your discretion; your dataset should be set up so that it is free of any major noise if you go for lower hop sizes, because it increases the risk of bad data in your dataset being focused on when you have higher pitch accuracy, for obvious reasons.
Two things you should know though:
Edit: We used to recommend harvest for lower quality datasets, but there’s a good chance the ‘rmvpe’ method is better than both mangio-crepe and harvest for training (at least better than harvest), even on high quality datasets. This feature just got added, so please test and see.
With that being said this is the old text:
- Mangio-Crepe (SPECIFICALLY MANGIO-CREPE NOT THE OTHER ONE WHICH IS UNTESTED) and harvest are both decent options. I’ve noticed if your dataset isn’t very high quality, or is more ‘noisy’, harvest can be better than mangio-crepe, as mangio-crepe is more data sensitive so it has better pitch accuracy. It is unknown if training mangio-crepe at a high hop size for less accuracy (like 256) helps poorer datasets sound decent, but in theory I would guess that that’s the case.
- Don’t use pm or dio for training. Dio sounds terrible and gravelly, and pm sounds grainy.
Basically:
IF YOUR DATASET QUALITY IS GREAT, MOSTLY FREE OF NOISE: Use Mangio-Crepe, but rmvpe training is new and seems promising based on early tests!
IF YOUR DATASET QUALITY ISN’T GREAT: Use rmvpe, or harvest if that somehow has problems, or higher hop size mangio-crepe(?) (i.e 256)
Set your value and hit Feature extraction. Wait till the colab text console mentions that it has ended feature extract (all-feature-done) similar to the end preprocess.
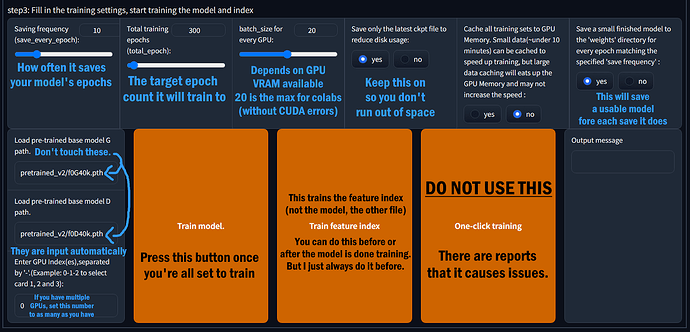
Batch size is how much data it processes at a time (speed option, not a quality thing). This depends on GPU VRAM. So for a RTX 2070 for example, with 8GB VRAM, you use batch size 8.
On a colab’s GPU, 20 is the value people tell me is safe from erroring out, but I was also told it’s best to stick to a power of 2 (so 2, 4, 8, 16, 32). So I use 16 on colab.
DO NOT USE ONE CLICK TRAINING, it’s bugged. Keep on ‘Save only the latest ckpt file to reduce disk usage’ always. Refer to other tips here too if needed. Set a decent amount of epochs to cover yourself like 600. Before you start, read the training cont’d section to figure out how you’ll test the model while it trains, and how to know when you’re overtraining. Once you’ve trained your feature index (2nd big button), you can hit ‘Train model’ to start training, but before that, let’s gloss up on some important features:
Training, Cont’d.
- Test model while training (this is important)
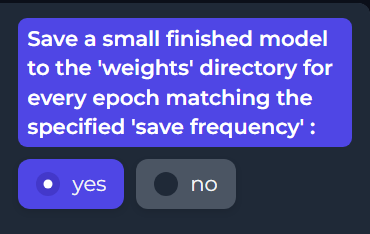
If enabled, the option saves the model as a small .pth file in the /weights/ path for each save frequency (e.g., Kendrick_e10, Kendrick_e20 for a ‘10’ save frequency setting). To get an accurate (early) preview, generate the feature index before training; of course you must make sure you followed the first two steps (data processing + feature extraction) before training the index. You could also generate the feature index afterwards if you forgot to do so. Having this option on enables you to test the model at each epoch iteration if necessary, or use an earlier iteration if you overtrained too far.
- What epoch count do I set? / How to know if ‘overtraining’
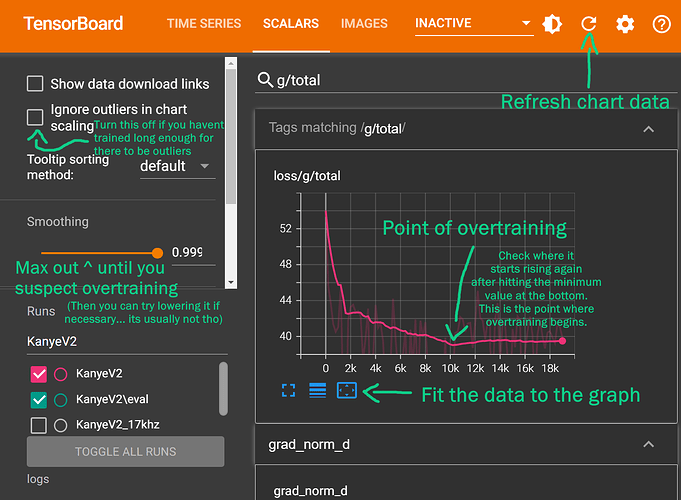
Use the TensorBoard logs to identify when the model starts overtraining. Go to the TensorBoard screen in colab. If training locally, use the Launch_Tensorboard.bat file in the RVC fixes folder (this probably won’t work – try this TensorBoard install guide) Click the scalars tab, and search for g/total on top. That means g/total, with a g. Not d/total.
(the V2 option in the training tab reaches the best point much faster than V1 does)
Once you find the ideal step count, do basic math to figure out the ideal epoch count.
For example, let’s say 10k steps is the point where overtraining starts. Let’s say you overtrained to 20k steps, and your model is at 600 epochs currently. Since 600 epochs is 20k steps, that means, 10k/20k = 50%. 50% of 600 = is ~300 epochs, roughly; so that is the ideal epoch value in that scenario.
Alternatively, you can find the timestamp of the best value in TensorBoard, and then check the train.log file for the model in the /logs/ folder for the matching timestamp to find exactly which epoch.
Less epochs generally means the model will be less accurate, rather than necessarily ‘sounding worse’ for v2 training. However, if your dataset isn’t so high quality or lacks a lot of data, you might wanna experiment later on and see which saved epoch model is the best balance between accuracy and sounding good. In some rarer cases, less epochs might sound better to your ears. It’s trial and error for making a good model at this phase. If you wanna stay on the safe side, I would go for a ‘slightly under trained’ model.
( Max smoothing option on the left side out btw, and remember to hit refresh to update it when needed)

You can also search for your specific model by name if necessary.
If you see overtraining begin and you’re confident of it, hit the ‘stop training’ button. You can now test your peak training epoch model (for example, Kendrickv2_e300_s69420) for 300 epochs.) If you’re happy with how it sounds now, rename the latest file in the colab in the /weights/ folder (found inside the colab files panel), to the name without the _e100_s1337 (so Kendrickv2_e300_s4000 would become Kendrickv2.pth). If you’re not, you can resume training where you left off.
I must stress you must edit the name from within the colab files panel. You cannot rename the drive file, otherwise the following step won’t work.
Then you can run this cell:
Your finished model zip will now be ready in /RVC_Backup/Finished/ as a zip file, ready to share.
Keep in mind we require you to upload this to huggingface.co to avoid false takedown requests if you want to publish this in the AI HUB discord in #voice-models. Google Drive is known to do false takedowns, even though voice models are 100% legal to share.
For more info refer to: https://discord.com/channels/1089076875999072296/1089329140483764265/1121859324424224818
- Continue training a model where you left off
For colab users: If your session expires (that means Colab fully disconnected), you must run the installer steps again, and then proceed as normal, launching your GUI server again.
During a retrain, to continue where you left off, use the same exact name (with the same capitalization) and sample rate (default is 40kHz if unchanged). Use the same settings that you had before for batch size, version, etc… make them match.
Do not re-process the files and do not redo feature extract again. Basically, avoid pressing “process data” or performing “pitch extraction” again, because you don’t want it to redo the pitch analysis that it already did.
Only keep the two latest .pth files in the /logs/ folder for the model, based on their date modified. If there is a “G_23333” and “D_23333” file in your model’s logs folder, it represents the latest checkpoint, if you ticked ‘Save only latest ckpt’ (which I recommend doing earlier in this guide already). If that wasn’t on, for some reason, remove all .pth files in the folder that aren’t the latest, to avoid inaccuracies.
Now you can start training again by pressing ‘train model’, with the same batch size and settings as before. If the training starts from the beginning again (at epoch 1 rather than your last saved epoch before the training stopped), immediately use CTRL+C or the stop button if on colab to kill the GUI server, to stop it, and try starting the GUI again.
- (For local trainers) Avoid crash / feature extract issues
When training locally, there is a problem during feature extract, where people will attempt to run feature extract on max thread count (top right option of training tab) and run into it either taking hours or it blue screening. I would set the thread count value in the top right of the training tab to a max of 5, or pick a value of 2 just to stay on the safe side (the preprocess step won’t take long). My default max is 20 (locally) and this doesn’t function. The threading is not automatically decided yet, but this is the part that takes very little time, so it’s fine to stay on the safe side and go low.
Dataset Creation Advice
- Isolating instrumentals / noise
First, find your source material you want to train a voice model on. This will be the dataset you train your model on. Preferably you get this in the highest quality possible (.flac preferred over mp3s or YouTube rips, because .flac is lossless quality, but lower quality stuff will still be usable, just not recommended). Ideally you have actual official acapellas, but those are extremely hard to come by for most music.
In order to isolate vocals from music you will need to use one of the following:
-
UltimateVocalRemover (can be ran locally on good PCs or within the RVC Google Colab pages at the end). 438 is the best ‘general’ model, Voc FT model will sometimes isolate non-vocals but it can sound better overall (you can run it and then UVR-Denoise model after it to deal with this). 438 is one of the VIP models, you can find the VIP code on the UVR patreon for free.
-
Small UVR video explanation: https://youtu.be/ITNeuOarHHw
-
MVSEP.com (totally free web app, but the queue can be long. I’ve been told MDX B is the general best option for vocal isolation here, but haven’t used it myself).
-
Vocalremover.org or X-minus.pro; these are not as high quality options but will get the job done quickly. Vocalremover.org has no option to remove reverb, and IIRC X-minus.pro doesn’t either. I would advise you do not make voice model datasets using these sites due to them being lower quality.
-
Removing reverb / echo
It is necessary to remove reverb / echo from the dataset for the best results. Ideally you have as little there as possible in the first place, and isolating reverb can obviously reduce the quality of the vocal. But if you need to do this, under MDX-Net you can find Reverb HQ, which will export the reverbless audio as the ‘No Other’ option. Oftentimes, this isn’t enough. If that did nothing, (or just didn’t do enough), you can try to process the vocal output through the VR Architecture models in UVR to remove echo and reverb that remains using De-Echo-DeReverb. If that still wasn’t enough, somehow, you can use the De-Echo normal model on the output, which is the most aggressive echo removal model of them all.
There’s also a colab for the VR Arch models if you don’t want to run or can’t run UVR locally. No clue how to use it though so good luck. Without a good GPU on your PC, UVR will still run locally in most cases, but it will be quite slow, if you’re okay with that. But if you have a long dataset, be prepared to have it running overnight…
- Noise gating to remove silence
I like to noise gate my stuff in Audacity to remove noise in the ‘silent’ periods of the audio.
Please download Audacity:
Usually -40db is a good threshold for this.
Adobe Audition probably has more advanced tools to do this automatically (idk how to use it), but this is a good preset to start off with for people using basic Audacity mixing. If it cuts off mid sentence, redo it with it turned up for the Hold ms.
- Isolating background harmonies / vocal doubling
In most cases, these are too hard to isolate for dataset purposes without it sounding poor quality. But if you want to try anyways, the best UVR models for doing so would be 5HP Karaoke (VR Architecture model) or Karaoke 2 (MDX-Net). 6HP is supposed (?) to be a more aggressive 5HP I think? Dunno. YMMV so try out the other karaoke options unless it literally just isn’t working no matter what.
- Do I need to cut up my audio into pieces?
Technically, the answer is no, for RVC at least. You can have a huge 10 minute file as the only file in your dataset and RVC will chop it for you properly when following this guide’s instructions, from my test. RVC chops into ~4s bits, so make sure your samples are at least 4s long for consistency reasons (or merge the shorter samples into one long file). If you wanna stay on the safe side, you can split into 1 minute intervals (the regular interval labels feature in Audacity is great for that.)
EDIT: Just found out someone had issues because their 1 hour and 30 minute single wav wasn’t getting processed correctly (? could’ve been an issue on their end). For very long datasets it may be an issue if you don’t split them. Under 30 mins, no issue.
- How much audio do I really need for the dataset?
Not that much actually. More is obviously better, but I don’t see a huge point in training a model with more than an hour’s worth of data. You can get away with some REALLY limited dataset models on RVC v2, but the less data you have, the more ‘guessing’ the AI has to do on how your voice is supposed to sound at certain pitches. A reasonable high quality range would be 10-45 minutes.
Here’s an example of my 10 second JID model rapping:
Audio Player
00:00
00:00
[Use Up/Down Arrow keys to increase or decrease volume.](javascript:void(0)![]()
Sounds good because I gave it 10 seconds of rapping as the dataset right?
But it sounds a lot less accurate trying to sing:
Audio Player
00:00
00:00
[Use Up/Down Arrow keys to increase or decrease volume.](javascript:void(0)![]()
The recommendation from the RVC devs is at least 10 minutes for high quality models that can handle a variety of pitches and tones, but remember: Quality > Quantity.
This is an example of a 5 minute model trained on high quality clips.
And this is a model trained on 7 seconds of Minecraft Villager sounds. Somehow, it works.
- Download more models in UVR
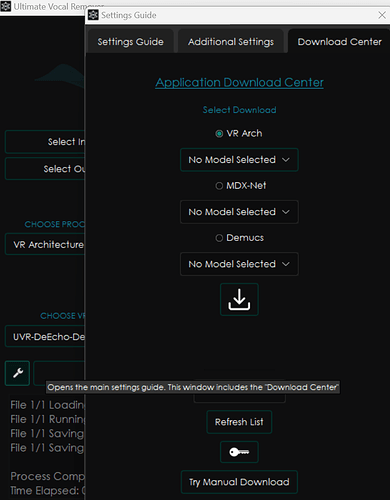
Go to the wrench and then ‘Download Center’ to find the tab where you can find any models I discuss in the guide that aren’t downloaded yet.
- General Guide
RVC v2 AI Cover Guide (by kalomaze)
- TensorBoard fix guide
Installing TensorBoard Locally for RVC (without errors)
—————————————————————————————————
